Monday, May 16, 2016

Boys' Bathroom Reno

the BEFORE

So I imagine you thought we had given up on this blogging venture.  Nope, still here.  As it turns out, life happens and you have to take time to do other things sometimes.  I have enjoyed many date nights with my boys, long weeks at the office and fabulous pregnancy naps.  But, we're back, and with our return is my promised post of our boy's bathroom makeover.

The above "before" picture is literally stolen from MLS and features everything I loathed about this bathroom from GO.  One piece shower, wretched below builder-grade, non-descript colored paint that stains if you breathe wrong near it, poor tiling job and hidden linen closet behind the door (Truth: when we moved in, I honestly thought there wasn't one.  Since I never went in and shut the door behind me, I didn't discover it until I went to hang the towel bars.  Yep, smart girl.)  While the granite is nice, everything was installed very shoddily, including paint on the mirror edges and the stunning brass light fixture that very obviously does not match the chrome fixtures everywhere else.

All of that said, I am not Nicole Curtis.  So, my aspirations leaned more toward touch ups and kid-friendliness.  My inspiration came from these adorable printables that I found on Etsy.
I fell in love with the color scheme, and built the rest around it!  Now, my husband will tell you, aqua is NOT a boy color.  I, however completely disagree.  It's cool and calming, and when coupled with a nice blue and green, certainly masculine in my book.  And, what mom doesn't like filling the rooms their children occupy with reminders of their manners?  Here's how my turned out with kid-reachable, monogrammed towel hooks below:


Ok, so theme in mind, I had to start pulling out all of the things that had accumulated in this bathroom previously.  And since the "hidden" linen closet happens to be the only linen closet in our house, this was quite a lot of crap, evidenced in the picture below:


Bet you wouldn't guess Ms. OCD lives in this house.  Yeah, out of sight, out of mind.  So, between thisc nightmare closet and under the sink, procrastination (and prego naps) got the best of me for a couple of weeks.  Once I finally got my act together and moved all of the unneeded items to either the trash or laundry room shelving and reorganized the medicines on a high shelf there, I was able to start the major undertaking of painting.  I quickly realized this was not going to be a one-woman job and employed not only my husband, but big brother Colin in taping, painting and replacing the light fixture and hardware.

Once we were back to a clean palate, I could add in all of the goodies that would make this the perfect space for my boys to function.  I had to start at my go-to store and the one we can all get lost in for hours...Target (bathroom boycott nonsense notwithstanding).  While I wasn't too crazy about the color choices in towels, I did manage to find a great shower curtain, some storage bins for under the sink and in the closet and cute little curtain rings.  All of these items kept with the color scheme, with the exception of the curtain rings, but I liked the design and decided to do a mini-diy and make them what I really wanted.  A little bit of paint and mod podge and voila, no more gaudy orange and pink!


To pull the colors together more, I grabbed some manly aqua bath mats from Home Depot, along with new nickel towel bar, toilet paper holder and towel hooks.  My walls were looking bright and clean, but lacking some serious color, so I went searching for a few more printables to coordinate.  Never underestimate a search on Pinterest.  I went with these three for my boys:

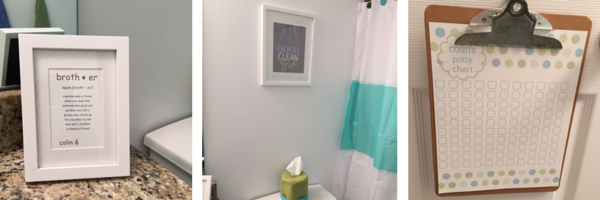
sweet brother art, good clean fun, and the potty chart
Simple, clean, cute and coordinating.  Missing items for these include, a name for baby boy #2, which we are having a rather difficult time deciding on (as you probably noticed above in the post, the lack of a monogram in the same vein), as well as the training involved in utilizing the potty chart.  I'm frankly terrified of starting the process and keep delaying the inevitable.  But, when we're both brave enough, it's there!  :)

              Martha Stewart provided the perfect colors for towels (of course) through Macy's.

So, this brought me down to organizing.  Y'all this is my favorite.  I need my mommying to be efficient so I have to set myself up for success, even when it comes to bath time.  And, while I found some great storage at Target, there were countertop items that needed homes.  As luck would have it, the new and extravagant outdoor shopping area that they just built less than two miles from my office, happens to include a little place called The Container Store.  Um, guys, go here (I'm talking to you, Amanda!).  You will not regret it, whether you have OCD like I do, or you just plan to organize anything, anywhere in your house.  I could have moved in.  I'll say this, my lunch break was not very much within it's one hour limit that day, but I did get out of there only spending $45, which I counted as a victory!  Below are the items I grabbed to keep this bathroom in check (all of which happen to be plastic in order to avoid broken glass around the kiddos).


Cute little foaming soap bottle, to keep the sink mess-free, bamboo containers for q-tips and flossers on the countertop, plastic trash can for easy cleaning, mesh laundry bag for convenient laundry disposal and coordinating, reversible bin which I flipped upside down and sliced to use as a tissue holder (seen in printables pic above).  

Shopping complete, I had to bust out several of my "crafty things," as Jordan so lovingly refers to them: my Cricut and my laminator.  I cut vinyl lettering to label the bins under the sink to keep everything in its place (and to be sure everyone else does the same.).


And printed some cutesy labels for the upper bins in the linen closet, on the shelves kept away from tiny people.  But, I needed them to last, so I fired up the laminator and tied the labels on those with coordinating twine.  The results turned out much nicer to look at than the previous contents and ultimately easier to find.


Again, there was little reno done here, and mostly reorganizing and decorating, but the results are definitely easier on the eyes and more kid-friendly.  Here's the finished product:

the AFTER

Let's hope the new digs add to the enticement when we finally buckle down and start the potty training process!  Wish us luck!

                                                                                xo

Friday, April 1, 2016

The In-Between


Ahhhh yes, the relief of heading into trimester #2.  Am I right, ladies??  Less exhausted, less nausea, more energy and more feeling like you!  FALSE.  I am more tired the last week than I have been throughout this pregnancy so far AND I'm faced with the daily nightmare of deciding what to wear.  Guys, I hate being a working mommy and getting up early and getting dressed on a regular day.  But now, I absolutely dread it.

Before I go further with this, let me give a quick caveat: I am thrilled to be expecting baby boy #2 and can't wait to squeeze and love on him.  However, I am not a fan of being pregnant.  I wasn't the first go-round and that hasn't changed.  I commend the women that enjoy it, but I'm certain that I've never felt worse than I do during the first half of my pregnancies.  I'm sure there is judgment from some women, but I have to be real and say what I feel, or I won't be me.  Also, I'm not a fit person in normal time, so that certainly doesn't help during the time when you're "allowed to gain weight."  Hey, guess what...when your doctor says that, she means like 25 lbs, Kate...not 50!  See bachelorette #3 down below (next to teeny and tiny), who I lovingly refer to as Clydesdale Kate.  PS, who ever made maternity clothes with stripes??


So, back to my closet, which by the way looks like a small bomb exploded in it, since I'm too tired to do laundry until the weekends and have to try on roughly 27 outfits a day, before I ultimately put on one of the first that I tried.  The most fantastic part of this "in-between" stage is that it comes sooner with your second pregnancy.  YAY  So, when I thought I was developing a bump with sweet Colin and I was pushing 5 months, I looked like this, :


I should have been grateful.  Cause guess what folks?  That's way too close to how I look today.  Day two of my second trimester.  3 MONTHS in.


Rude, indeed!  So, I try to squeeze every last moment I can in my "regular" clothes, using whatever means necessary, but rubber bands only hold for so long and when you have to pee every 20 minutes, it's hardly convenient.  The beauty part of this whole situation, is when you finally admit you should bust out those garbage bags of maternity clothes and examine whether any of them will work for you currently, you find that they don't fit either.  Seriously?  If you need me, I'll be in my granny panties and too small bra, on the floor of my closet, sobbing.  Even better than that, while you prep for baby and how much money you won't have for all of the necessities, you try to figure out how you can possibly go out and pick up some better fitting maternity jeans.  You know, ones that aren't dubbed "mom jeans," ones that have a built-in belly that you can neatly tuck up under your bra (cause let's be real, those under-belly things are a joke), and ones that actually come in long/tall so that you don't look like you're going digging for clams.  Leaving you with the following for your "perfect" outfit:


This does not count as business casual, FYI.  So, instead I have been the Muffin Top Gal, daily at work and miserable as a result.  You think taking off your bra at night is relieving?  Changing into jammies has become releasing the Kraken for this girl!  And all the while, my sweet husband has told me how "hot" I look.  Thank you, sweetie for whatever you are seeing that is attractive and thank you, God for giving him the eyes that can see it.

And, if the constant paranoia of what is hanging over my pants is not enough, you can add those adorably pregnant girls that remain tiny until delivery and magically pop back into their pre-baby bump jeans the day they come home from the hospital.  (Tried that one after Col was born and I'm sure that factored into my chest pains following.)  You know them.  There are tons of them on social media these days, rubbing it in.  Alllll baby.


Ok, you are not real.  You can't be.  Look at the picture on the right.  I mean, these women are the same amount of weeks into their pregnancies.  Same.  The reason this is infuriating to me is mostly because I'm SO the one on the right, or will be shortly.  I'm one of those girls that carried her baby everywhere, including my already bulbous nose.  I don't intend to be huge this time, but my body is not made for teeny.  It just isn't in me (as evidenced from the picture above).  Amen to you for being able to maintain a healthy lifestyle, but Mama likes to eat.

For those of you that are in my boat, there are ways to combat it.  I have been reading up on tons of them, in order to keep myself in the right mindset.  I found this great little list on dealing with the "fat stage" from fellow blogger, Beth at Nothing but Neutral that has helped me turn a corner.  She is stylish and witty, and her tips are helping to center me back on what's important here, my sweet boy!  So, taking Beth's advice, I am pulling out all of my loose shirts, heeled shoes, and started eating more healthily.  Salads galore over here, though like her, I have to indulge my sweet tooth every now and then.

I'm not going to extremes, but I am trying to be more conscious of what I'm putting into my body.  Colin is even benefiting some with several trips a week to local parks in the afternoons to keep this and his growing body moving.  I definitely won't be one of the women who develops Pregorexia.  No, seriously, it's a thing.  Some women make extreme efforts "to control pregnancy weight gain through extreme dieting and exercise."  There is no danger for me here, as I basically loathe exercise and very much enjoy food.  However, I do see how this stage could push one to it.  

That said, I am going to remind myself that I am more conscious of the changes than anyone and that perhaps I need to cut myself a little slack.  I am doing this all for the baby boy that I can't wait to meet in just 6 more months.  I am lucky to be blessed with this opportunity and need to keep that foremost in my mind.  But, I warn you, don't let me catch you staring anywhere near my mid-section these days.  I may be able to fool myself, but you don't mess with a prego lady.  Point out the weight gain, and


   No lie.  Bon Qui Qui knows.  

And as a distraction from the current horror of my body changing and closet status, I am redesigning our guest bathroom for our boys this weekend--so stay tuned!  Can't wait to share it with you!

       xo


Friday, March 11, 2016

Spring Things - Yarn Pom Pom Bunnies


My mind has been on all Spring things lately. Seeing daffodils blooming, hearing birds settling back into our neighborhood and finally feeling warm weather have all been such happy changes! The official start of Spring is just around the corner and I keep seeing these little yarn pom pom animals popping up on my Pinterest feed so I thought it would be a cute and easy craft to do with the kids. As darling as the baby chicks and lambs are, I decided we would start with the bunnies.

 
My favorite part of starting a project is gathering my materials- especially when I realize I need some supplies and get to take a trip to Michaels! These sweet little bunnies require only a few things:

-Yarn (I picked up a fairly thick and super soft acrylic)
-Felt (one in a coordinating color to your yarn and the other a light pink- these will be the bunny's ears)
-Mini pom poms for the tails
-Hot glue gun/sticks
-Scissors
-Glass beads (black and pink for the eyes and nose)

There are probably a half dozen or more ways to make yarn pom poms. Some use cardboard discs, some use toilet paper rolls, some use forks, some use actual pom pom makers (they're real things!) I chose to just use my hand. Because I'm lazy. And I like things to be simple. Because I'm lazy.

  • To start, decide how big you want your pom pom to be. They will vary in size a bit depending on how many fingers you wrap your yarn around. I started with three for the body of my first little guy. 
  • Wrap the yarn around (I didn't count or measure- just eyeballed) until you have a good amount to get "fluffed" later, then cut. 
  • Cut another strand of yarn about 10 inches or so to wrap around the center of the yarn. I started on my palm and ran the yarn strand down from my fingertips, then through my first and second fingers. I needed a little help so I used a candy stick that was randomly in my crafty stash to push the yarn strand through.
  • Once it's through, tie a tight knot, then loosen the yarn off your hand. 
  • Flip it over and tie another tight knot on the other side. 
  • Take your scissors and start cutting through all of the loops in your yarn circle until you reach the other side. 
  • You'll have a shaggy little yarn pom on your hands at this point.
  • Grab the scissors again and give it a trim to make a neat little pom pom.
  • Once you have the first one, you can make another in a different size so you have both a body and a head. With your hot glue, assemble the two pom poms together. Cut some ears from your felt and glue those on the smaller pom. Glue the glass beads for the eyes and nose. Grab one of the mini store-bought pom poms and glue it on the larger pom for the tail. 
That's it! You have a fluffy pom pom bunny! 

You can make these just about any size and any color using any type of yarn you prefer. The thicker the yarn and the more you wrap around, the fluffier your pom pom will be. I have seen some with googly eyes rather than the glass beads, some with whiskers, some even wearing clothes. You really can do whatever you like with these. In hindsight, I wish I had used the original felt color I had picked out for the ears and I may go back and add some whiskers. And maybe trim their chubby cheeks. Hopefully mine will start to look better as I make more (my husband said "What are those? Snowmen? Cool.") But I think they're fun and pretty cute. I can't wait to see what the kids do with theirs!


I made a few of these scraggly little guys today so I thought I would add them to our Spring mantel, which I kept pretty low key this year. Over the years, my Aunt DeeDee has given me beautiful Longaberger baskets for my collection. I love how pretty these baskets are but they're also really functional! She has given me three St. Patrick's Day baskets which I usually display above our kitchen cabinets along with some others. This time of year I like to show them off on our mantel to add some St. Patrick's Day fun and break up the Easter-y feel. I tucked a bunny into one of these little baskets. He likes it up there. He's close to the jelly beans.


I added another guy into the top of my Longaberger Easter basket which, incidentally, is the same basket I used every Easter growing up. Lots of 80's and 90's gear has nestled into this bad boy over the years (I'm especially referring to you, New Kids on the Block book. Jordan Knight always.) and "The Easter Bunny" still puts fun treats into it for me to this day. I sat one more bunny next to a sweet Spring printable I found here which I printed and framed.

They all look pretty cozy hanging out among the other Springy things on our mantel. As an insanely sentimental person who is "nostalgic to a fault" I love to display things that are not only aesthetically beautiful, but which also mean a lot to me. Obviously the baskets are special to me because they remind me of my Aunt DeeDee, my parents and many Easters growing up. That little yellow bird cage on the far right was part of the decor my family added when they surprised us and made over a room in our house for Leah's nursery. The white bunny next to it was given to Connor by his Gigi when he was upset about having to go back home after a fun day playing with family we don't get to see very often. The small pink tulip votive holder and candle were a gift from sweet Kate for Mother's Day a few years ago. The glass bead garland was something I bought at a store in Lenox Mall near our old house in Atlanta when Nora was our only baby and it had been lost through the years until recently. Finding it just brought back memories of being a new mom and my oldest being a tiny little miss. 

I'm looking forward to making more memories with my sweet kiddos this weekend when we work on this little bunny project together. I think we'll make a bunch so we can gift them to our cousins on Easter Sunday.

I hope your weekend is filled with sunny skies, good company and happy memory making! 

xoxo 


Tuesday, March 8, 2016

No. 2, the Elderly Gestation


So I'm finally sharing the news with our readers!  It's been rather difficult to find things to write about while carrying such a secret, but worth it in order to be sure we were good thus far.  FYI, this being my second pregnancy, the telltale sign was for sure severe tenderness of the breasts.  When in doubt, test.  And test again.  Good thing I did!  

Of course, we are over the moon that Colin will have a little playmate before his third birthday and are anxious to start preparations for Baby Hill #2.  Having said that, I have gone into this pregnancy with quite a bit of apprehension as well.  As I'm fairly certain it's common to have fears with any pregnancy, I found myself initially consumed with one in particular and needing to step back and find comfort in the joy that this new baby is actually going to bring.  


So, try that one on for size...  Not even over the hill or close to it, and considered geriatric.  When the woman at my doctor's office used the technical term for my next pregnancy at my last appointment, I about choke-slammed her.  Seriously?  I'm 36 and I feel like they're going to hand me a cane and a bag full of Depends, Ben Gay and arthritis medicine on the way out of my first appointment.  Bad enough that my biological clock is barely ticking anymore, but the outside world considers me of advanced maternal age?  Nice.  

But, ok, I get it, you shouldn't worry about what other people think.  So let's say I don't.  The fact remains that a woman over 35 goes into pregnancy with more cards stacked against her.  Now, while that doesn't bother me for myself, what about that poor tiny, developing baby??  Let's consider the biggies in the risk department for us geriatrics: greater risk of miscarriage, higher risk of multiples and birth defects, pre-term labor, greater risk of c-section or still birth, etc.  

Holy shit.  I mean, as a mother, we worry about the day-to-day goings on during our normal pregnancies, enough to download at least one of the hundreds of apps with the daily development and sizes according to fruits we've never heard of.  (What in the hell is a kumquat??)  But, now I'm thinking of the steps I can take to help avoid the what-ifs of being older.  

We always knew we wanted Colin to have a sibling, so this pregnancy was definitely not a shock.  That said, when I stopped taking my birth control, I tried to be proactive as my friendly OB recommended and started a prenatal.  When I was pregnant with Colin, I opted for the generic brand from Target and stuck with those until I was through nursing him.  Pretty basic, not much thought.  This go-round I wanted to do a bit more and provide every little extra I could for my little one.  A good friend introduced me to a fabulous, all natural brand of vitamins called Rainbow Light.  Now she has been known to take up to 20 odd supplements a day.  I am so not that dedicated, but for this baby, I knew I wanted to look at what I could do to nurture the development as much as possible.  They have this incredible prenatal specifically made for "Moms age 35+."  They started out winning points for not calling me old.  

the magic
But the key for me was the emphasis on brain and nervous system development.  Since advanced maternal age can affect those directly, I was convinced to spend the little bit of extra money and go with these prenatals.  They are all natural, of course, but also contain ginger to help ease the tummy and B vitamins for energy.  The only drawback I've been able to find is that you need to take three a day.  This has been a hard habit to develop, but so worth it, especially if it really helps protect my teeny tiny.  

Now, we all come into pregnancy expecting a boatload of testing, including the all too few ultrasounds that give us peeks at baby.  The bloodwork, the measuring, the weighing, the finger pricking, pelvic exams, ad nauseam.  All of these tests are routine and all are in an effort to ensure baby's health.  However, the older mommy gets, the more tests are added to the list.  And, for the most part, the more invasive they become, ie: CVS (Chorionic Villus Sampling) and Amniocentesis.  Both of these are done with needles inserted into the uterus to screen for different types of chromosomal anomalies.  The thought of a needle being inserted anywhere near my fragile developing child makes my blood run cold.  I know the people that administer these tests are experts, but there are no guarantees.  

Imagine my elation at my eight week appointment when I found out that waiting to get pregnant at this advanced age actually benefits not only me, but my sweet baby!  First, the advances for prenatal testing...One inclusive test that covers chromosomal anomalies, several other diseases, as well as detecting baby's gender as early as 10 weeks.

Harmony Prenatal Test

Ladies, with a simple blood test, you can discover more accurate and completely non-invasive results for your baby's health based on their DNA.  I didn't believe it was possible, but having taken mine not even a week ago, and doing tons of research, I am on board!  Not only will we be prepared should baby have any problems in development, but also, OCD mommy can prep that nursery starting at 12 weeks!  Testing shows that "The harmony test is 99% accurate for gender prediction while an ultrasound is 95% accurate for gender prediction." (according to TrimesterTalk.com)  And this is real life now, people.

My second worry-reliever during this nine month journey has been a little pill that was prescribed to me only a week ago.  Y'all, Declegis, it's a tiny miracle.  When I was pregnant with Colin, I had pretty bad "morning" sickness most days, all day.  Now, I wasn't Princess Kate throwing up, losing weight sick, but enough to make me sufficiently miserable, daily.  So, naturally with this second pregnancy, I expected much of the same and indeed it has been.  My poor husband must think I'm just saying I don't feel good by habit anymore.  So last week, I'm filling out the paperwork as usual and they ask about my pregnancy symptoms.  Um, exhausted, feel like vomiting whenever I'm awake...I thought those went without saying.  Turns out, not so much.  Then they handed me some samples.

Simply amazing.  The dosage again, takes some getting used to (at least two hours after eating and once first thing in the morning), and for the narcoleptic that I currently am, some alarm setting, but I haven't felt so good in weeks!  I've actually been able to function through rocking Colin before bed, which last week nearly made me puke.  Amazing!

So, being elderly aside, nausea abated, and baby's health in check, I am down to the typical new mommy again worries; Will I love this child as much as my first? Am I capable of that type of love twice? Do I have this mommy thing down, since I've done it once?  And, since my first child has been a dream baby, will my next one be awful (cause if one more person tells me this one, I may have to do them bodily harm)?

But I have to tell you, the bigger picture makes these seem easy to deal with.  I know I will love this baby just as much as I love Colin, because I didn't know this type of love until I held him on my chest.  I know I don't know everything about being a mommy, since I'm still learning everyday.  And every child is unique and wonderful.  And, God will give me the baby I'm meant to have, regardless of personality because we were meant for each other.  

Funny, right after I had Colin (days post partum), I saw a doctor that's a family friend for chest pains.  They were merely stress related, which made me feel foolish, but I think we tend to underestimate ourselves.  Our bodies endure quite a lot for our babies.  At that time I was astounded at the fact that women would voluntarily do this numerous times.  Dr. Alan told me that mothers have temporary amnesia when it comes to delivering their children.  Everything that we think is painful and difficult fades and the joy and love that being the mommy to that child brings, overwhelms all else.

I've decided to let my mommy amnesia kick in early this time.  I'm going to enjoy this geriatric pregnancy for all that it is, as it will be the last time I will do it.  I'm going to allow the joy that this child will bring to our lives keep the worries at bay.  Hell, maybe I'll even let them hold my cane once in a while!

Harmony results to come! XO

RESULTS UPDATE!

Just wanted to share that Baby Hill #2 is perfectly healthy according to the Harmony test and is....
ANOTHER BOY!  We are thrilled and have started the lengthy process of picking out the little mister's name.  :)


Friday, February 26, 2016

Diaper Cake Decadence


Ohh how I love hearing there's a new baby on the way!  I'll never forget when my sister found out she was pregnant with her first (the first of our generation).  Such excitement!  At the time, I had never heard of diaper cakes, though her shower was exquisite and pink perfection.  Second baby showers are not too common, as the first one supplies mommy and daddy with much of the needed gear that babies require.  However, when you are decked in pink and a baby boy is due, a Sprinkle is the sure answer for pulling some of the necessary blues into the equation.  A Sprinkle is a lighter version of a baby shower; much less elaborate and meant to supply only the essentials for a second baby.

Annie's Sprinkle did afford me my first opportunity to try my hand at diaper cakes.  The process I used then was fairly tedious, as I used an older technique that requires rolling, for every diaper.  I have to say, the result was adorable and a great addition to the nautical decor in the theme, but the process left me with three problems to solve.  1. Rolling an entire package of diapers takes forever  2. Holding said diapers in rolls takes a ton of rubber bands (and frankly, they smell awful)  3. When mommy goes to use the diapers, they have to be unbanded and unrolled individually (which any mommy with a poopy infant knows is SO not efficient).  

So, while I knew it wasn't the ideal way to go about things, I had one more go before changing the process.  When my sister Denise was having her first baby, we threw her an elephant themed shower, complete with matching treats and of course, a diaper cake.  Again, cute and matchy, but not perfect.


And so, recruited to co-host a shower for a dear friend years later, I took to Pinterest to discover a new process that was easier, wouldn't produce ruined diapers, and still looked precious.  A new method discovered, I found that I could make them with more ease, fill them with more treats and produce some lovely cakes.  This method makes a smoother edge and does not damage the diaper!  Here are a couple more examples, followed up with my supply list and method for the ideal diaper cake for a new mommy.

Polished Diaper Cake DIY

supplies:
1-2 12-14" cardboard cake board
2-3 sizes cake pans (depending on amount of layers)
twine
1/2 yard desired fabric (ironed)
assorted coordinating ribbons (multiple widths)
75-90 size 1 & 2 diapers (preferrably white, no prints)
glue gun
glue gun sticks
coordinating paper shred
assorted baby goodies to hide inside or decorate with (pacis, bibs, toiletries, etc.)
coordinating decorations/topper
roll of cellophane wrap

Let me begin with saying that making a diaper cake can be as inexpensive or expensive as you'd like.  I tend to get carried away with a theme, as you know if you've read our blog before.  But, I will say, the most expensive one I've made did not exceed $65 for all supplies.  So, that is left to your discretion and is mostly dependent on what you stuff inside and decorate with.

So, you'll start with your cake board, the base to your cake.  Take the fabric and stretch it flat onto the cake board.  Start hot gluing the fabric to the bottom of the cardboard and continue smoothing and gluing around the base.  Now, this can look icky on the bottom.  In truth, this won't show, but if you're a spaz, like I am, you can cover a second cake board and glue them together to hide the bunching and glue.

Now that you have your base, you'll start filling the cake pans with diapers.  I find the best way to do this is to grab a handful, seat part showing at the outside and fan them inside the circle until they meet on the other side.  Tuck in the end of the last one and be sure to leave some space in the center to hide goodies for mommy and baby (I usually work around a toilet paper roll and then remove once I'm ready to stuff).  Use your twine to secure the diapers and pull tightly to create a firm layer for your cake.  Depending on the amount of layers, repeat this process for each.


Once the layers are complete, you can move on to the stuffing and decorating part.  The tough part about these cakes is that you really don't want to secure the layers to the base with glue, since the intention is for the diapers to be usable.  So, again make sure that once you stuff, each layer is pulled tightly.  Take your assorted ribbons and wrap around the layers at your discretion, securing with tiny dots of hot glue around limited spots around the outside.  I usually add some embellishment to each layer, whether it be a character or something personalized.

Then you're ready to assemble your layers!  With the bottom layer placed on the cake board, sprinkle with paper shred to cover the hidden goodies and add a little "frosting."  Continue layering up from here until you have reached the top layer.  This is another opportunity for a great personalized topper and something a little bigger for impact.

Generally, I'm pleased with the results from here, but I have to put in an extra step that I usually wouldn't, purely for transportation reasons.  I'm not a big fan of how diaper cakes look wrapped in cellophane, but given that you cannot glue them completely together, the cellophane will allow for easy transport to your shower and can be quickly removed if need be.

See?  Easy!  And, as I'm getting ready to start the task of potty training my little guy, I'm anxious to be rid of the diapers.  Not sure who might need a diaper cake with size 4's in it, but I'm SURE there's someone, somewhere...right??  But, seriously, who can resist a gorgeous cake?  Especially when it smells like a teeny tiny baby?!  Happy "Baking!"


Friday, February 19, 2016

Tinkerbell Party

It's Friday! We're finishing out our week off of school with plenty of sun and warmer temperatures than we've been having lately, thankfully! The icky grey skies and chilly weather has had me constantly dreaming of warm breezes and the smell of spring flowers. I thought today would be the perfect time to flashback to a sweet birthday party we had when our littlest miss turned two. She was completely obsessed with all things Tinkerbell so I knew we would be having a Pixie Hollow party.


I chose lavender and sage green for the main color scheme and stuck with simple fairy accents rather than anything overly cartoon-y. My sister Kate let me borrow her Cricut (...again...it's on my list...) and her Tinkerbell cartridge. I used it to cut the lettering on the banner, the fairies on the tent cards for the buffet and also for the fairy details on the invitation. I set the beverages on the sideboard and hung the banner above. I also printed and framed a little quote, "Laughter is timeless, imagination has no age, dreams are forever."

I collected some branches from our backyard and hot glued lavender silk flowers randomly on each one. I Cruicut-ed a few paper butterflies and hung those from a few branches along with some colored glass crystals. I put the branches in a green vase and added it to the buffet table.


We typically plan our parties for late in the afternoon so we can coordinate naps and avoid our kids having complete meltdowns in the middle of everything. Also, despite all of my crazy lady lists and planning, I always need every extra second of the day I can squeeze in. That all being said, for these late afternoon parties, we typically don't need to have a huge amount of food. For this one, we had Fairy Fruit Wands (grapes and strawberries on bamboo skewers with a star-shaped piece of honeydew melon at the top), Sugared Butterflies (iced butterfly sugar cookies), Twisted Twigs (pretzel sticks), Rosetta's Garden Veggies, Fawn's Acorn Treats (Mini Nutter Butter cookies with Hershey's Kisses), Pixie Hollow Hummus, Pixie Pops (large marshmallows dipped in white chocolate with purple sprinkles), and Fairy Berry Cupcakes. For beverages, we had Tinker Tonic (sprite and lime sherbet), Silvermist's Dew Drops (bottled waters) and Iridessa's Icy Lemonade.


I recruited my dad to handle this cake. My amazing dad, who happens to be the smartest man alive and can build and fix anything, has made countless cakes for myself and my sisters while we were growing up. Minnie Mouse, Jasmine, Nala, Pongo from 101 Dalmations, Anjelica from Rugrats, Shrek- the list goes on. I'm sure he figured he was off the hook once we grew up, but every once in a while we ask him to take on yet another. He cuts and pieces the cake into whatever shape of the character and then ices them, freehand. It's ridiculous. He will tell you he hates doing it and he will criticize every bit of it once he's finished, but it's always incredible. We just have to bribe him with Starbucks to do it.  


I ended up finding this template for the little Tink favor boxes. I found a lime green cardstock and cut and assembled them. Then I embellished each with vellum wings, a thin satin ribbon belt and paper flower. I added pixie stick wands with a small paper star on the end. Inside, I tucked some small candy treats, bubbles and a tiny jar of pixie dust. A couple years ago, Michaels carried a Recollections Vintage Romance line and I was lucky enough to find this six piece set of glitter in tiny corked jars, which were just perfect for pixie dust!


We have a little coat/storage closet off our front foyer so I decided to transform it into a little dress up room for the kids. I hung a tulle canopy inside along with some fairy costumes on the rack, added a few Tinkerbell accents along with a Pixie Hollow sign on the door. I placed a small table inside with a vase full of fairy wands for the guests to take home. I made the wands using wooden dowels wrapped in satin ribbon with light green and lavender tulle attached at the top. 
 

Our little miss absolutely loved her Tinkerbell party. We kept some of the decorations out until her actual birthday a few days later and I made a little coordinating Tink bunting to top her cake. She still remembers this little party and asked to have it again this year, nearly two years later! It was so much fun to put together and extra fun to look back on today!


Happy weekend, everyone! And remember, if things get tough all you need is "faith, trust, and a little bit of pixie dust!" (Probably coffee too.)

xoxo,