Showing posts with label minutiae. Show all posts

Friday, February 19, 2016

Tinkerbell Party

It's Friday! We're finishing out our week off of school with plenty of sun and warmer temperatures than we've been having lately, thankfully! The icky grey skies and chilly weather has had me constantly dreaming of warm breezes and the smell of spring flowers. I thought today would be the perfect time to flashback to a sweet birthday party we had when our littlest miss turned two. She was completely obsessed with all things Tinkerbell so I knew we would be having a Pixie Hollow party.


I chose lavender and sage green for the main color scheme and stuck with simple fairy accents rather than anything overly cartoon-y. My sister Kate let me borrow her Cricut (...again...it's on my list...) and her Tinkerbell cartridge. I used it to cut the lettering on the banner, the fairies on the tent cards for the buffet and also for the fairy details on the invitation. I set the beverages on the sideboard and hung the banner above. I also printed and framed a little quote, "Laughter is timeless, imagination has no age, dreams are forever."

I collected some branches from our backyard and hot glued lavender silk flowers randomly on each one. I Cruicut-ed a few paper butterflies and hung those from a few branches along with some colored glass crystals. I put the branches in a green vase and added it to the buffet table.


We typically plan our parties for late in the afternoon so we can coordinate naps and avoid our kids having complete meltdowns in the middle of everything. Also, despite all of my crazy lady lists and planning, I always need every extra second of the day I can squeeze in. That all being said, for these late afternoon parties, we typically don't need to have a huge amount of food. For this one, we had Fairy Fruit Wands (grapes and strawberries on bamboo skewers with a star-shaped piece of honeydew melon at the top), Sugared Butterflies (iced butterfly sugar cookies), Twisted Twigs (pretzel sticks), Rosetta's Garden Veggies, Fawn's Acorn Treats (Mini Nutter Butter cookies with Hershey's Kisses), Pixie Hollow Hummus, Pixie Pops (large marshmallows dipped in white chocolate with purple sprinkles), and Fairy Berry Cupcakes. For beverages, we had Tinker Tonic (sprite and lime sherbet), Silvermist's Dew Drops (bottled waters) and Iridessa's Icy Lemonade.


I recruited my dad to handle this cake. My amazing dad, who happens to be the smartest man alive and can build and fix anything, has made countless cakes for myself and my sisters while we were growing up. Minnie Mouse, Jasmine, Nala, Pongo from 101 Dalmations, Anjelica from Rugrats, Shrek- the list goes on. I'm sure he figured he was off the hook once we grew up, but every once in a while we ask him to take on yet another. He cuts and pieces the cake into whatever shape of the character and then ices them, freehand. It's ridiculous. He will tell you he hates doing it and he will criticize every bit of it once he's finished, but it's always incredible. We just have to bribe him with Starbucks to do it.  


I ended up finding this template for the little Tink favor boxes. I found a lime green cardstock and cut and assembled them. Then I embellished each with vellum wings, a thin satin ribbon belt and paper flower. I added pixie stick wands with a small paper star on the end. Inside, I tucked some small candy treats, bubbles and a tiny jar of pixie dust. A couple years ago, Michaels carried a Recollections Vintage Romance line and I was lucky enough to find this six piece set of glitter in tiny corked jars, which were just perfect for pixie dust!


We have a little coat/storage closet off our front foyer so I decided to transform it into a little dress up room for the kids. I hung a tulle canopy inside along with some fairy costumes on the rack, added a few Tinkerbell accents along with a Pixie Hollow sign on the door. I placed a small table inside with a vase full of fairy wands for the guests to take home. I made the wands using wooden dowels wrapped in satin ribbon with light green and lavender tulle attached at the top. 
 

Our little miss absolutely loved her Tinkerbell party. We kept some of the decorations out until her actual birthday a few days later and I made a little coordinating Tink bunting to top her cake. She still remembers this little party and asked to have it again this year, nearly two years later! It was so much fun to put together and extra fun to look back on today!


Happy weekend, everyone! And remember, if things get tough all you need is "faith, trust, and a little bit of pixie dust!" (Probably coffee too.)

xoxo,

Thursday, January 21, 2016

Chalkboard-Inspired First Birthday Party


It's happening. Our youngest will be turning two next week and I am having a bit of a hard time accepting that. My baby boy...no longer a baby. Waaaahhhhh! So I thought I would take a trip down memory lane today, back to his first birthday nearly a year ago.

We kept it fairly small and simple, inviting just family and a couple close friends. I didn't want any kind of theme this time. Instead, I picked a color scheme and went with that. I found an adorable invitation from Tiny Prints which turned out to be the inspiration behind the chalkboard and blue. Once those were ordered, I started my lists and went out to pick up supplies!


One of the first things I started working on was the tassel garland. I love how these look and how they can be hung just about anywhere to add some fun color to the party. I used black, silver, light blue and royal blue tissue paper for this one. Once that was finished, I decided to use a 1.5" circle punch on my remaining tissue paper and make some confetti to sprinkle on the sideboard. It. Was. A. Pain. The tissue is too thin to punch easily, even when stacked, so I wouldn't necessarily recommend this. It took forever and kept getting stuck in the punch. But I really like how it added a little color so it was all worth it! 


I printed out a little chalkboard-inspired sign with fun details about our sweet one year old, put it in a  matted frame and hung it above the garland. They have a ton of these little signs on etsy that can be personalized for around $15 but as usual I didn't think of it in time! So I designed my own and printed it on dark grey cardstock. Not nearly as elaborate as the ones on etsy, but I thought it was really cute and a fun way to add something personal about our sweet boy.


As I mentioned, I found the chalkboard cupcake invitation on Tiny Prints' website. I thought it was simple but cute and it quickly inspired the theme of the party. I absolutely love Tiny Prints. I have been ordering from them for the past eight years. Birth announcements, baptism invitations, shower invitations, birthday invitations, Christmas cards, thank you notes, even Valentines! They have great personalized photo gifts too. The quality is always amazing and their printing and shipping time is super fast. They also have optional personalized RSVP sites when you order invitations! I just love them.


I usually set the paper products and beverages on the sideboard so they're easily accessible throughout the party. I found some chalkboard stickers and thought it would be cute to add them to plain white cups so guests could personalize them by writing their name on them with chalk. I also picked up some striped paper straws in black and blue. I made some pinwheels from double sided scrapbook paper in colors to match our theme and added them to the beverage station along with the tissue confetti. I painted a wooden craft letter "M" with chalkboard paint and centered it on the sideboard.


Since we had a good mix of adults and kids, I tried to have foods that would appeal to all ages. I set out some spinach dip with pita chips, cheese and crackers, fresh fruit and homemade cheese straws. For the sweets, I made cupcakes, rice krispy treats, sugar cookies (iced in a "chalkboard black" color) and a simple white cake with a small round chalkboard icing circle in the center with a "1" in white icing. I found mini chalkboards on clothespins which I used for the food labels.

I made a banner from scrapbook paper in dark grey and light blue and added the wooden letters to spell "one." I hung this across the front of the buffet table, added a few more paper pinwheels and several Project Life cards with sweet sayings. I also made a blue tissue paper pom pom, which I planned to hang...it just never made it up there. The kids had fun tossing it around though!


When it was time for cake, our birthday boy got down to business. I made a large cupcake instead of having an entire cake for his smash cake. He wasted no time digging into it and ended up with it EVERYWHERE. In his hair, his ears and between his eyelashes. It was cringe-worthy. But he loved it.

He had a great time running all over the place and playing with his cousins. It was a fun first birthday party!

Looking ahead a little to next week, I am going to have to start bracing myself now. My babiest baby will be two, which really is the end of the baby years. That is a bit heavy and a little bittersweet. We will be having a simple and small celebration, but I can assure you wine will most certainly be on that party menu for this mama!

If you need me, I'll be crying into my cup of coffee.

xoxo


Friday, December 4, 2015

Polar Express Party

The Polar Express holds very special memories for so many people. I remember checking the Caldecott-winning book by Chris Van Allsburg out of the library at Elsmere Elementary over and over again, wishing I would wake one Christmas Eve to the sound of the steam engine outside my own window. Since the movie's release in 2004, it has become a tradition for us to watch it at least twice during the Christmas season. When Nora was about a year and a half, she asked to watch "Choo choo moonie" almost every day in December and when Connor was around two, he wanted to watch "Po-fress" every day. All year long.


When it came time to plan his third birthday, he asked to have a Polar Express party. I thought it would be fun to do a pajama party since the kids in the story were all in their jammies. I found these "believe" cards in Target's Christmas section, printed and adhered a photo of the famous train with the details of the party to the inside, making sure to add a note at the bottom asking guests to remember to bring their ticket. I printed out these Polar Express tickets on gold scrapbook paper and tucked them inside the card.
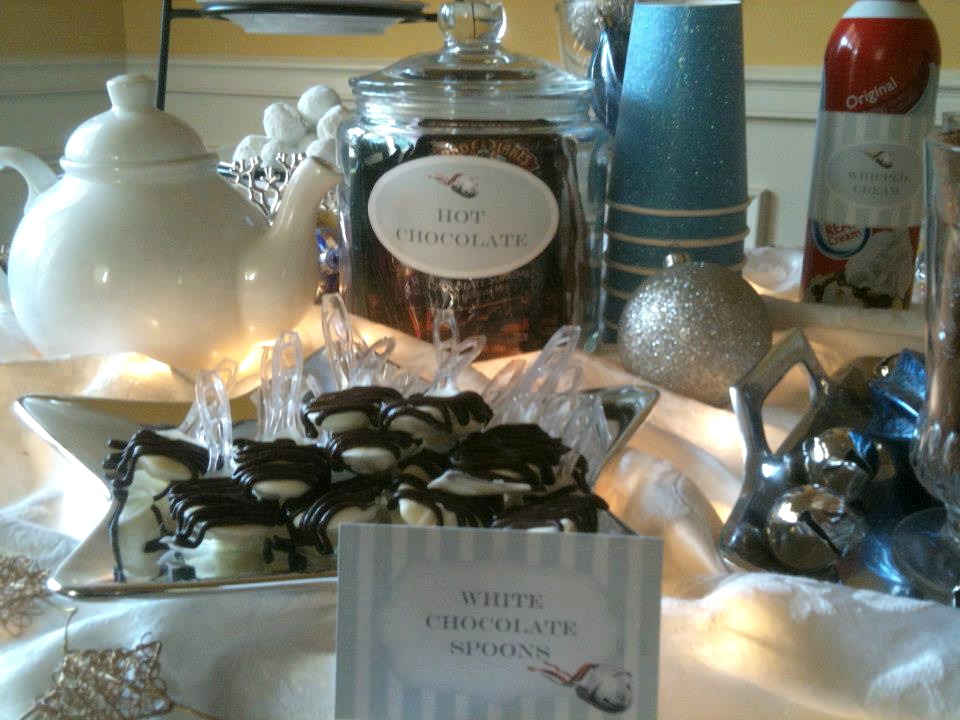
I decided to have a hot chocolate station, since the hot chocolate scene is a favorite with our kids in both the book and the movie. I also set some warm apple cider out for anyone who didn't like hot chocolate. I covered plain white paper coffee cups with blue glitter scrapbook paper. While this looked really cute, I don't necessarily recommend it unless you like glitter in your beverages. It. Was. Everywhere. 


I covered the buffet table in white linens with a couple strands of white lights underneath. I added silver and blue ornaments, star garland and jingle bells around the table. I hung some white glitter snowflakes from the ceiling and chandelier along with a train birthday banner my sister Kate made for his first birthday party.


I set out a jar with assorted flavored hot chocolates next to a kettle of hot water and white chocolate stirring spoons.We had several different toppings and mix-ins for the hot chocolate set up in these cute water goblets I picked up from Pottery Barn for a steal (and I later discovered the reason: they all perished shortly after, along with the rest of our Pottery Barn glassware...not very sturdy. Get it together, Pottery Barn!)


We had candy canes, cinnamon sticks, caramels, marshmallows, chocolate sprinkles, mini chocolate chips and whipped cream to add to the hot chocolate and cider. I found some printable labels and tent cards online and customized them with a picture of the Polar Express bell. I attached the labels to wooden paddles to stick down into the goblets of toppings.


As for the food, I stuck to simple sweets. "Snowball doughnuts," as Connor calls them, stacked on a tiered stand, fudge brownies, white chocolate covered pretzels and little s'mores bites. These were a fun addition and a hit with everyone. I used a small round cookie cutter to carefully cut each graham cracker, then added a large marshmallow and Hershey Kiss to each. They went under the broiler for a couple minutes and that was it!


The cake was just 8" rounds with a 6" layer on top. I carved out of the side to make it look like a mountain, iced it in grey buttercream and added some white icing on the top and edges to look like snow. Then I added black licorice for train tracks, a couple bottle brush trees and our wooden Polar Express train climbing the "mountain."


As the guests arrived, our little conductor/guest of honor was ready with his ticket punch. He punched each ticket and directed everyone to the hot chocolate station. We had the movie on in the background, but no planned activities for this party as it was mostly family and a couple close friends. Connor and Nora each wore their Polar Express jammies from their Mugga and Papa. They took turns receiving "the first gift of Christmas"- the silver bell from Santa's sleigh - while drinking their heavily-topped hot chocolates.


The birthday boy spent the rest of the evening in his blue robe with the bell in the pocket, engineering his very own Polar Express!

The Polar Express has become a big part of our Christmas traditions. They have Polar Express Day at school, where the kids parade around the school wearing a box they have decorated to look like a train car, they drink hot chocolate and watch the movie. We have ridden the "Santa Express" on Blue Ridge Scenic Railway, an hour-long train ride which includes hot chocolate, Christmas carols, stories and activity books, elves delivering candy canes, Mrs. Claus delivering a bell and, of course, Santa himself posing for photos.

We read the book and watch the movie several times each season. The magic of the Polar Express will forever stay part of our family's tradition. "The bell still rings for all who truly believe."

xoxo

Friday, October 23, 2015

Pampering Spaaahh Baby Shower


Becoming a mommy for the first time was quite possibly one of the best things that have ever happened to me.  I never knew I was capable of such intense feeling, until they laid Colin on my chest in the delivery room.  Frankly, I lost my mind and have been head over heels ever since.

You can imagine how excited I was when one of my closest friends, Jessica found out that she was pregnant with her first baby!  I was so thrilled to welcome her to the mommy club, but as is the norm, she was understandably nervous about all that she was about to go through.  So, my dear friends and I decided that we would throw her a shower that would not only provide her with the things she and baby would need, but also help to relax her before his arrival.

Jessica and her hosts L to R, Amanda, Randy, Kate & Kim (Randy and Kim were not able to be there day-of, but they were part of the planning all the way through!)

With relaxation and baby boy’s nursery colors in mind, I set to work coming up with a cute logo for our “Spa.”  I wanted to create something simple that would invoke the spa atmosphere, but personalized for Jess.

Logo complete and ready to be applied generously to all of our party details, I began the invitations.  One of my gracious co-hosts, Amanda bravely offered to have the shower at her home (despite the fact that we intended to have self-service spa sessions) and the guest of honor chose a lazy Saturday afternoon.  Setting perfection.  Of course, I made sure the invites included her registry information, but Amanda had a great plan on an additional fun inclusion for them; a diaper raffle!  Totally brilliant idea from the four time mom, in order to build up Jessica’s supply for when baby arrives.  I think all mommies know that one of the most expensive things a baby needs are DIAPERS (and lots of them).  Guests were encouraged to bring along a package of diapers for entry into a prize-winning drawing.  They turned out to be pretty adorable:


Once the invitations were out, I hit my usual spots for ideas; Pinterest, Hobby Lobby, Amazon, Home Goods and yes, Dollar Tree (I’m NOT loaded, y’all).  Amanda was working on the menu and decorations, while I concentrated on activities and favors.  There would be spa stations, and the raffle, as well as BINGO that centered around Jess' gift opening.  These girls would be taken care of!


We wanted to set up small self-service spa stations for the guests around a large table.  This would allow them to socialize, as well as pamper themselves in the same area.  We set up two stations each for facials, manicures and pedicures around Amanda's dining room table (See?  BRAVE)
I wanted the ladies to be well-supplied while they pampered themselves, so I decided to do a "pamper me bar."  Through the years I've been doing parties, I've accumulated quite the collection of jars and vases for bars such as this, so those supplies were on hand.  The spa supplies were another story entirely.  And so, I began with a site that I had used several times before, nailsupplies.us.  They are priced unbelievably for a non-licensed commoner, such as myself and that is very appreciated!  Amazingly, while browsing, I discovered a collection I had never heard of before...ready for it?  Jessica Cosmetics.  Yep, her very own name.  I found the perfect signature shade that not only matched our theme, but also had "boy" in the title!


Supplied with two dozen of these, matching moisturizers and base and top coats, I dove into the accessories which I knew would be needed to complete each girls' service.  Armed with coordinating favor bags with logo stickers, the girls could pick and choose what they liked and take home treats for further spa treatments at home.  


As I planned more, I was more confident with the task at hand and decided to do some additional crafting for the "bar."  This can prove to be a great idea...or a sad failure.  In my case, there was a little of both!  The three that made it to the table were the Kool Aid Lip Balms (done in Blue Raspberry Lemonade flavor/color), the Creaseless Hair Ties (in matching aqua and gray) and the Homemade Bath Salts (colored aqua and displayed in individual tubes).


And of course, my beautiful, sad little failure...the Bath Bombs.  This may seem like an easy DIY, but I can assure you, for the girl who skipped over Chemistry in high school and avoided it in college like the plague, it is not.  I followed the directions exactly, with one adjustment (which is listed in the instructions as an IF).  I added more water, since they seemed too dry.  DON'T add more water or your bombs will be ruined, as evidenced by the photo below (courtesy of my husband and captioned "Nailed it!").  Even perfectionists with OCD fail sometimes!


Needless to say, the bath bombs were eliminated from the final cut.  I'm fairly certain no one missed these horrifying things.

As the day came closer, Amanda had assembled a banner, framed some adorable printables to display around the shower and mastered another craft I failed on a previous occasion (Stained Glass Votives-hers were done in aqua)!


The printables were so cute, I have to share and give credit to the designers!

Perfect Gift, Little Boy, Colby K & Relax

Decorations and spa stations set, we went to two grocery stores and began prepping food.  This of course, had to keep with the theme and with Amanda's expertise in cookie frosting and melon slicing, we had some lovely results!  We put out "rolled towel" turkey wraps, fruit cups, cheese and crackers and made sure we had some sweets.  The table below housed the coordinating Lindt truffles, "cucumber" cookies, aqua frosted cupcake minis and the "nail file" wafer cookies.


And as is necessary when lots of women assemble to celebrate a new baby, we served a bit of champagne (with OJ and Blue Curacao),  The Mimosa Moons were a hit and matched perfectly, though we did have to call for emergency refill supplies!


The day was a huge success and Jess went home with tons of goodies off her registry, as well as diapers to last for quite some time.  I'm pretty sure she will still be using them for months to come!  The girls helped pamper her and give her a day to remember long after Colby made his debut.  Having a newborn is not exactly relaxing, but I know her life is changed forever in only the best way.  And I'm beyond thankful that we were the ones to honor her as she waited for him.  Love you Jessie!

Jess' sweet boy, Colby (isn't he JUST??!!)

Wednesday, October 21, 2015

Everything is Awesome! Lego Party


Legos. All of our kids absolutely love them, but our six year old could sit and work with Legos for hours on end. When he decided on having a Lego party, we weren't too surprised.

I found this Lego invitation, which I personalized and ended up sending electronically via Paperless Post. They are my new favorite. They offer paper or online invitations, cards and stationery, plus a custom event page to keep track of guests' responses.


I started making my lists first. Are you obsessive about lists like my family? My sisters and I inherited the list-making gene from our mom and it is strong. Lists for everything. I usually have at least four lists when planning parties:
-Party details (decorations, menu, activities)
-Shopping list (sorted by store, including estimated costs)
-Party setup (including menu items and coordinating serving/display pieces)
-Day-of schedule (list of to-dos for the day to be ready on time...which I never seem to be, despite the lists)
It's probably a little crazy, I realize. But it helps keep me organized and keep me on budget!

Shopping day is always my favorite, especially when it includes a trip to Michaels. Can we talk about Michaels for a minute? Anything and everything you need to craft and create, plus fun decor, cute gifts and...have you seen their Halloween section?? Add their 40% off any item and the bonus 20% off entire purchase coupons and it's just heaven. I picked up everything I needed and headed home to get started on some party details.

I saw a cute idea to make paper gift bags look like Lego bricks so I started working on those first. It couldn't have been any easier. I used my 1 1/5" circle punch and cut six circles for each bag from coordinating colored card stock. I attached the circles to the bags with adhesive foam dots and that was it!

They have silicone Lego molds on Amazon, which I was talking with my mom about the week before the party. Two days later, they magically arrived on my doorstep. Thank you so much, Mom! I had a few different plans for these, so I was really excited to have eight of them to work with! I made some jello and poured it into several molds. While those were setting, I made white chocolate candies, colored red, blue and yellow to accent the cake and cupcakes. With the remaining molds, I ended up making Lego crayons for the favor bags. The chocolates and crayons turned out great! The jello- not so much. It never set well enough to come out of the molds in one piece.

Thankfully, the grocery store had jello cubes which I layered by color in a glass bowl on the food table. The food was very minimal, as we had a late afternoon party. Aside from the jello blocks, we had white cheddar popcorn, mini club crackers with little rectangular cheeses, fruit, cupcakes and Lego head marshmallow pops. My mother in law came up with and constructed the block displays, which made the table!


Thanks to Pinterest, I found these cute Lego printables, which I added to the cake/beverage table. I printed this Lego birthday banner, cut each letter out and used the adhesive foam dots to attach them to red card stock pieces. I hung the finished banner behind the cake table.

I printed a plain Lego guy on white card stock and included a few Lego crayons in a cellophane bag. I also added a small bag of Skittles and a bag of basic Lego bricks. I found the Lego movie masks which my mom thankfully printed and cut for me! Two of my sweet friends added the elastic and we tucked a mask into each favor bag. I added a small tag to each using this template for the Lego guy and added our own wording, thanking the kids for coming to the party.


We didn't end up having many planned activities, and I completely forgot about one of them! I saw the idea to have the kids guess how many Legos are in the jar, which I put together and set out. I just forgot to take down the kids' guesses!


The other activity I thought would be fun was decorating their own Lego cookies. I used my favorite sugar cookie recipe and hand cut different shapes to look like Lego bricks. I made royal icing, colored it red, yellow and blue and set out small cups of it with little spoons for decorating. I set out some mini M&Ms for the kids to use as the studs on top of the cookie "bricks."


I thought the Lego guy's head would be pretty easy for the cake. I baked four 6" round yellow cakes, stacking three and using the fourth to cut and create the stud for the top. I did a crumb coat, let it sit in the fridge overnight and then frosted a final layer of yellow icing. I added the little face and the Lego cake was finished. Have I mentioned that I am not a professional cake artist?? Obviously! Yikes. While it wasn't as even or smooth as I had envisioned, our birthday boy was excited about it, which is all that really matters.


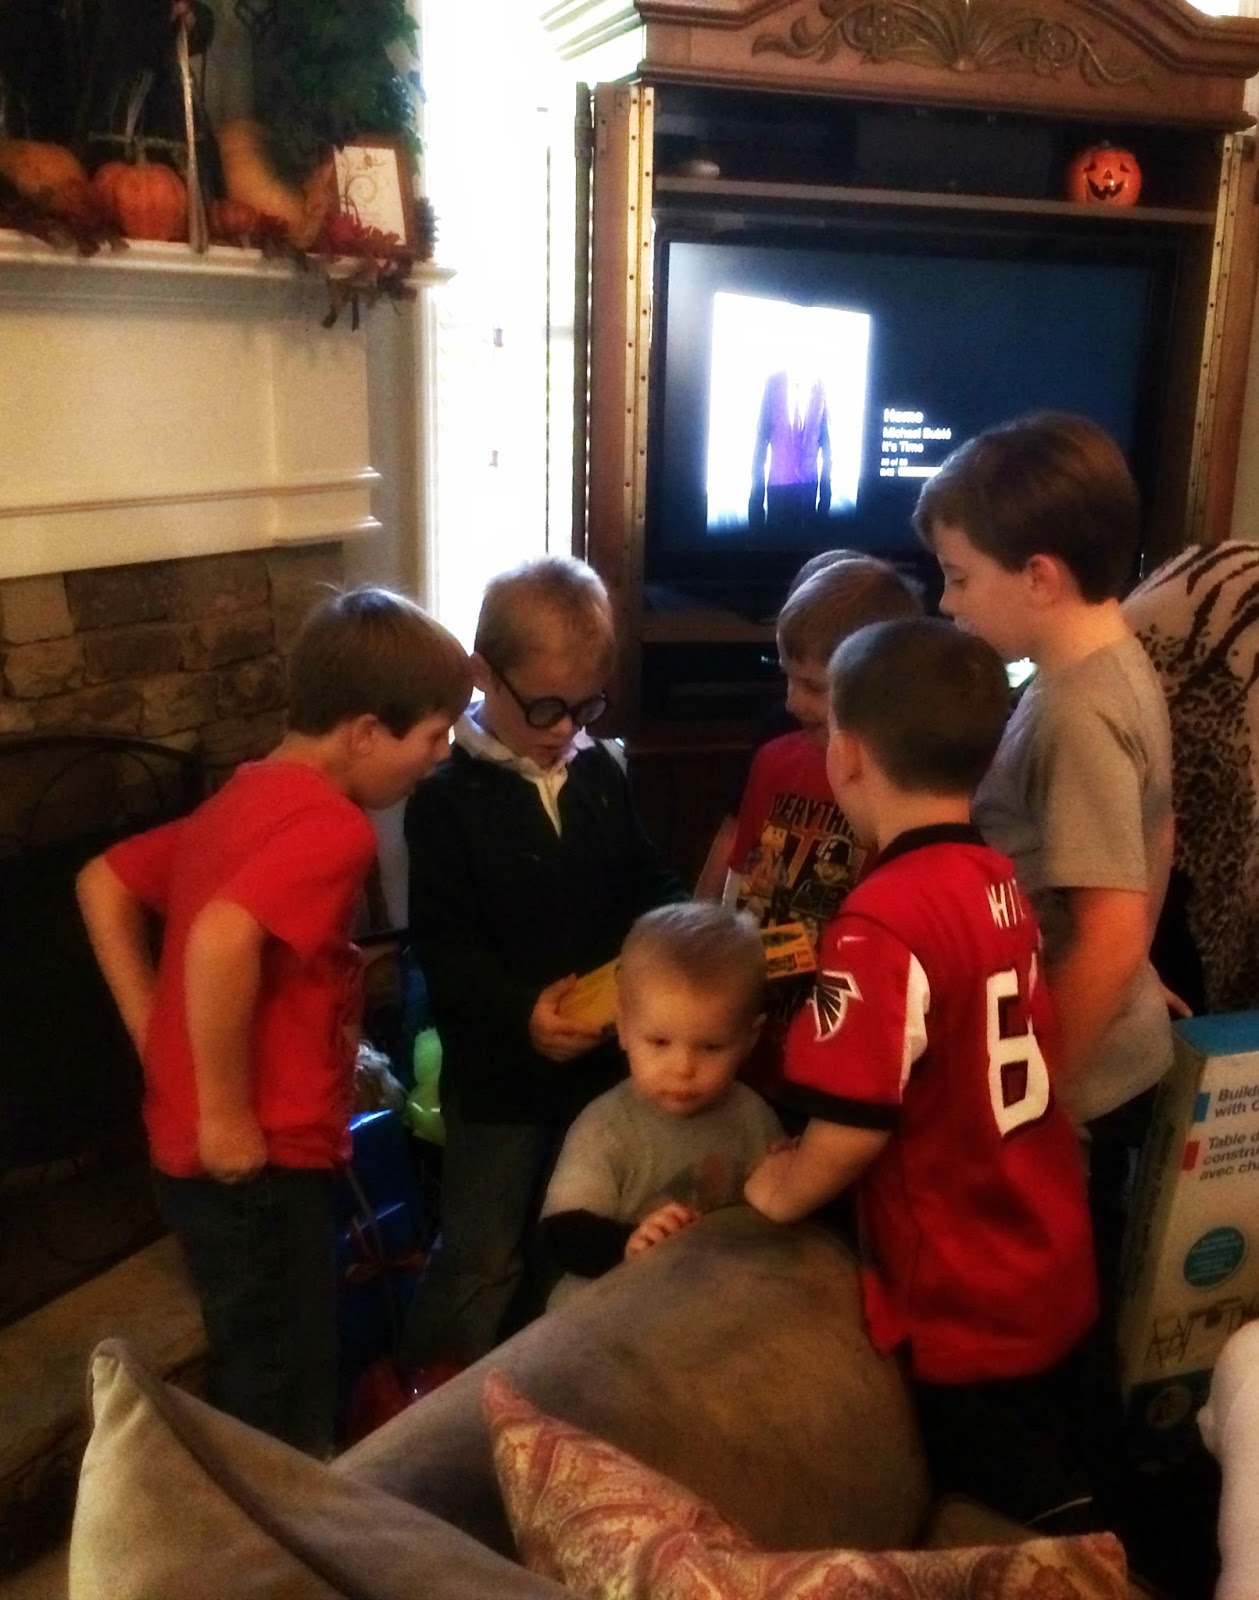
I can not believe how fast these kids are growing. I am trying my best to hang on to these days when they aren't "too cool" to do fun things like wear Harry Potter glasses all day, everywhere. He wore these for almost the entire party, which I just love.

It ended up being a really fun day for our birthday boy and I am so thankful for our friends and family for helping to make it all happen. Everything was awesome!